4.1. cFDK
Note: This HTML section is rendered based on the Markdown file in cFDK.
The cloudFPGA Development Kit.
- information_source
The cloudFPGA documentation is available at https://cloudfpga.github.io/Doc
4.1.1. Introduction
The cloud service architecture of cloudFPGA is comparable to a cloud service hosting traditional servers and virtual machines.
In cF, the equivalent of the CPU-based hardware resource is an FPGA device and its surrounding board components. We refer to such an FPGA card as a cloudFPGA Module (MOD).
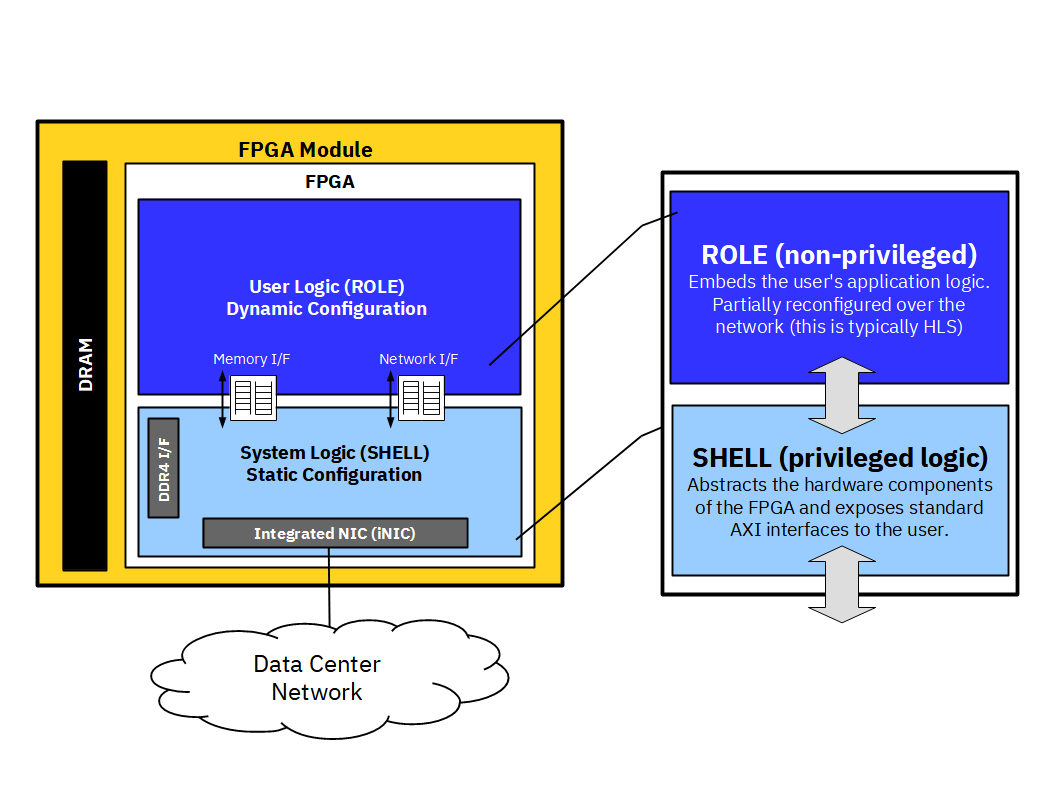
In cF, the equivalent of the OS kernel is a piece of reconfigurable logic that contains the custom interfaces and run-time logic to host and run a workload. We refer to such a kernel implemented in logic gates as a cloudFPGA Shell (SHL).
In cF, the equivalent of a CPU application executed in user space is another piece of the FPGA reconfigurable logic. We refer to this user’s custom logic as a cloudFPGA Role (ROL).
Multiple combinations exist between various Modules, Shells and Roles. Once a user has decided for a Module and a Shell to run his Role, it is the duty of the cloudFPGA Development Kit (cFDK) to assemble the tuple {``MOD``, ``SHL``, ``ROL``} into a so-called cloudFPGA Project (cFp), and to produce one or multiple corresponding bitsream(s).

4.1.2. The cF Module
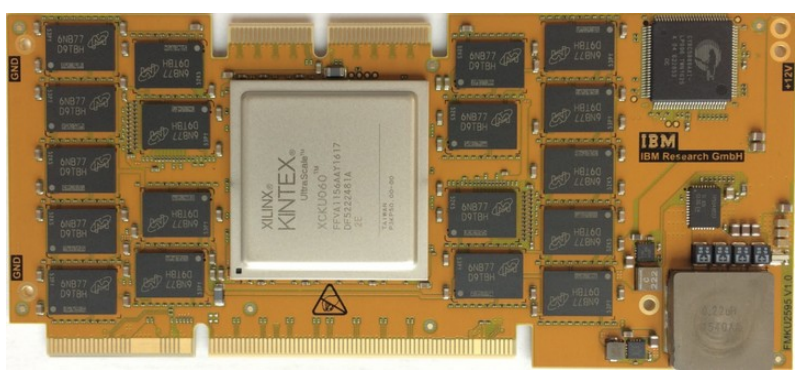
The cloudFPGA service is designed to offer different types of FPGAs on various kinds of cards. As mentioned above, a specific assembly of an FPGA and its electronic card is referred to as a cloudFPGA Module (MOD).
The following picture shows an example of such a cloudFPGA Module. It is called FMKU60 to reflect its equipped Xilinx Kintex UltraScale XCKU060 FPGA with 2x8GB of DDR4 memory*.

4.1.3. The cF Shell
As mentioned in the introduction, a cloudFPGA Shell (SHL) contains all necessary I/O components, the run-time modules and the network stack that hooks the FPGA to the DC network. It further abstracts all these hardware components by exposing standard AXI interfaces to the user.
A cloudFPGA Module is designed to support different types of Shells. Therefore, a developer must
decide for a specific SHL to use before creating a new application.
Currently, the following shells are available:
Kale - This shell provides minimalist support for accessing the hardware components of the FPGA Module. The shell Kale can only be used within a static implementation of the Shell and the Role, and must therefore be programmed via JTAG. The following interfaces are exposed to the Role:
a set of AXI-Stream interfaces for the UDP data and control paths,
a set of AXI-Stream interfaces for the TCP data and control paths,
one stream-based memory interface,
one memory-mapped interface.
Themisto - This shell provides enhanced routing support for node-to-node communications. Themisto is the current default cF Shell because it supports Partial Reconfiguration (PR) and can therefore be paired with a dynamically configured
ROL. Additionally, the reconfiguration of such a role is performed by the Themisto shell itself, upon reception of a new partial bitstream for the role via the TCP/IP network of the data center. The following interfaces are exposed to the Role:an AXI-Stream interface for the UDP data path,
an AXI-Stream interface for the TCP data path,
one stream-based memory interface,
one memory-mapped interface.
4.1.3.1. The Shell-Role-Architecture
We refer to the concept of pairing a platform-specific part (i.e. the SHL) with an
application-specific part (i.e. the ROL) as the Shell-Role-Architecture (SRA).
This architectural approach is the base of the design pattern used by cFDK to assemble a
pair of {``SHL``, ``ROL``} into a so-called Toplevel (TOP). Note that such an arrangement is
always made of a statically configured SHL, while the ROL can either statically or dynamically
configured, as depicted in the following figure.

4.1.3.2. The cF Project
Finally, the pairing of an FPGA design (i.e. a SRA) with a specific FPGA card (.i.e, a MOD) is
what makes up a so-called cloudFPGA Project (cFp). The current cFDK repository contains all
the source codes, the documentation and the build scripts that are necessary to create such a cFp.
A the end, a cFp is what a designer uses to develop its application in cloudFPGA.
4.1.3.3. How to create a cloudFPGA Project
They are two ways to get started with a cFp.
If you are new to cloudFPGA, we recommend that you clone or copy an existing project
(e.g. cFp_HelloThemisto) and that you
start experimenting by modifying or removing its ROL.
For the second and highly recommended approach, use the cFCreate framework when you need to
create a new project from scratch or to manage and update an existing one.
To use this framework, you need to clone the cFCreate
repository into your *\
$ cd <sandbox>
$ git clone git@github.com:cloudFPGA/cFCreate.git
$ cd cFCreate/
$ which python3
/usr/bin/python3.8
$ virtualenv -p /usr/bin/python3.8 cfenv
$ source cfenv/bin/activate
$ pip install -r requirements.txt
From now on, you can create a new empty cFp with the following command:
$ cd <sandbox>
$ ./cFCreate new --cfdk-version=latest --git-init <path-to-the-new-project-folder>
- Info
By convention, we recommend naming a project folder after the project itself while prefixing it with the string “cFp_” (e.g. cFp_Zoo).
For more information and more advanced options, please consult the documentation of the cFCreate repository.
4.1.3.4. Typical cFp file structure
A typical cFp file structure looks as follows:
$ tree <cFp_ProjectName>
    cFDK/ (the cloudFPGA development kit as a submodule)
    TOP/  (the toplevel that integrates a SHELL and a ROLE)
    └──tcl/ (don't touch, is copied from cFDK)
    └──xdc/ (user added constraints; you add your debug nets here)
    └──hdl/ (HDL version of the toplevel)
       └──top.vhdl
       └── a.s.o. (if custom hdl files for TOP)
    ROLE/ (the user application(s))
    └── role1 (or not, depends on PR, etc.)
    └── role2 (or not, depends on cluster)
    └── a.s.o.
    dcps/ (contains the dcps and bitfiles)
    xpr/ (contains the Vivado project)
    ip/ (contains the IP cores (generated during build))
    Makefile
    env/
    └── setenv.sh (sets the envrionment)
    <possible_addons/>