5.5.1. cFp_HelloKale
Note: This HTML section is rendered based on the Markdown file in cFp_HelloKale.
A cloudFPGA project built upon the shell Kale.
- information_source
The cloudFPGA documentation is available at https://cloudfpga.github.io/Doc
5.5.1.1. Overview
The integration of a user application and a cloudFPGA shell into a top-level design is what constitutes a cloudFPGA project.
This project builds on the shell Kale which is a shell with minimalist support for accessing the hardware components of the FPGA instance, and a role that implements a set of TCP and UDP loopback mechanisms for echoing the incoming traffic and forwarding it back to its emitter.
This setup corresponds to an FPGA server implementing only two UDP and TCP echo services.
The FPGA accepts connections on port 8803 and echoes every incoming lines back to the client
(using the carriage-return/line-feed sequence as line separator). The resulting traffic scenario
is shown in the following figure.

5.5.1.2. Shell-Role-Architecture
In cloudFPGA (cF), a user application is referred to as a ROLE and is integrated along with a SHELL that abstracts the hardware components of the FPGA module. The combination of a specific ROLE and its associated SHELL into a toplevel design (TOP) is referred to as a Shell-Role-Architecture (SRA).
The shell-role-architecture used by the project cFp_HelloKale is shown in the following figure. It consists of:
a SHELL of type ***Kale**_ which is a shell with minimalist support for accessing the hardware components of the FPGA module FMKU060. The shell Kale includes the following building blocks:
a 10 Gigabit Ethernet (ETH) sub-system,
a Memory Mapped IO (MMIO) sub-system.
a ROLE of type ***HelloKale**_ which implements a set of TCP-, UDP- and DDR4-oriented tests and functions for the bring-up the cloudFPGA module.
the documentation of the HelloKale code is available here.
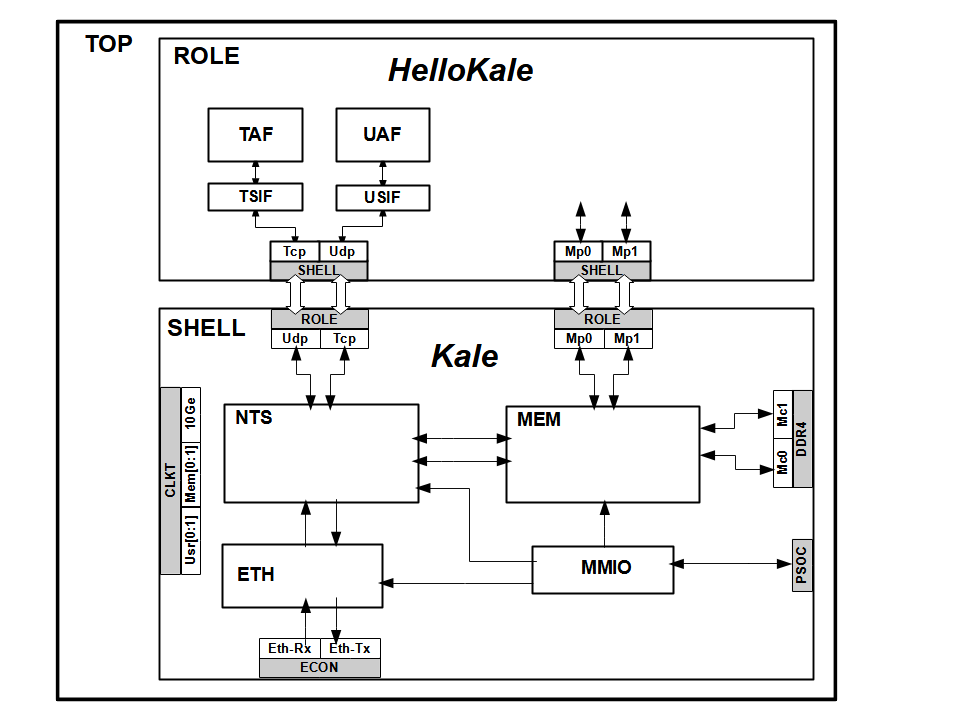
Toplevel block diagram of the cFp_HelloKale project
Info/Warning
The shell ***Kale**_ does not support Partial Reconfiguration (PR). It was specifically developed for the bring-up of a new FPGA module or for the deployment of a static implementation. As a result, the generated bitstream is always a static bitstream. Refer to the project _cFp*HelloThemisto* for an example of a shell that supports PR.
The static nature of the generated bitstream precludes its deployment over the datacenter network and requires the use of a JTAG interface to download and configure the FPGA.
5.5.1.3. How to build the project
The current directory contains a Makefile which handles all the required steps to generate a bitfile (a.k.a bitstream). During the build, both SHELL and ROLE dependencies are analyzed to solely re-compile and re-synthesize the components that must be recreated.
$ SANDBOX=`pwd` (a short for your working directory)
- warning
The following build procedure is only compatible with Vivado 2017.4 to 2020.1 versions included (for the time being).
5.5.1.3.1. Step-1: Clone the project
$ cd ${SANDBOX}

$ git clone --recursive git@github.com:cloudFPGA/cFp_HelloKale.git
    (if you don't have a GitHub account and/or SSH keys set up, use the command:
     git clone --recursive https://github.com/cloudFPGA/cFp_HelloKale.git)

$ cd cFp_HelloKale/cFDK
$ git checkout main
$ cd ../..
5.5.1.3.2. Step-2: Setup your environment
$ cd ${SANDBOX}/cFp_HelloKale
$ source env/setenv.sh
5.5.1.3.3. Step-3: Generate a static bitstream
$ cd ${SANDBOX}/cFp_HelloKale
$ make monolithic
The build is successful if you get the following message after ~90 minutes, indicating that a bitsream was
generated. You will find this newly created bitstream in the folder ${SANDBOX}/cFp_HelloKale/dcps,
under the name 4_topFMKU60_impl_default_monolithic.bit.
<cloudFPGA> ################################################################################
<cloudFPGA> ##  DONE WITH BITSTREAM GENERATION RUN
<cloudFPGA> ################################################################################
<cloudFPGA> End at: HH:MM:SS Day Month Day Year
5.5.1.3.3.1. Step-3.1: Save a checkpoint (optional)
If the design was successfully implemented, you can opt to save its corresponding checkpoint in the ‘./dcps’ directory. This will accelerate the next build by exploiting the incremental place-and-route features of Vivado.
$ cd ${SANDBOX}/cFp_HelloKale
$ make save_mono_incr
To request an incremental build, use the command $ make monolithic_incr instead of
$ make monolithic.
5.5.1.4. How to deploy a cloudFPGA instance
5.5.1.4.1. Step-4: Upload the generated bitstream
In order to program a cloudFPGA instance with your newly generated bitfile, you first need to upload it to the cloudFPGA Resource Manager (cFRM). The below step-4a and step-4b cover the two offered options for uploading a bitstream.
5.5.1.4.1.1. Step-4a: Upload image with the GUI-API
The cloudFPGA resource manager provides a web-based graphical user interface to its API. It is
available as a Swagger UI at
http://10.12.0.132:8080/ui/#/
To upload your generated bitstream, expand the Swagger menu Images and the operation
[POST] /images - Upload an image. Then, fill in the requested fields as exemplified below.
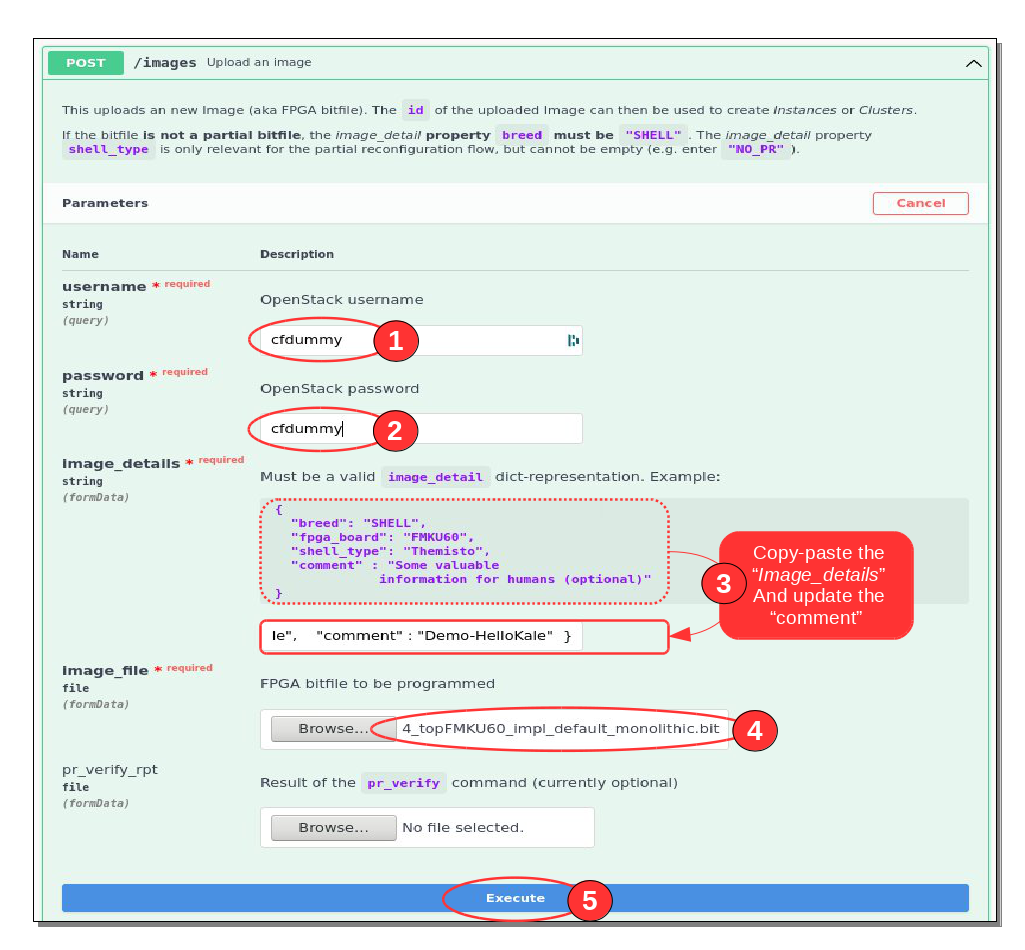
Next, scroll down to the “Response body section of the server and write down the image “id” for use in the next step.

5.5.1.4.1.2. Step-4b: Upload image with the cFSP-API
The second option for uploading a bitstream is based on a command-line interface to the cFRM API. This method is provided by the cloudFPGA Support Package (cFSP) which must be installed beforehand as follows:
$ cd ${SANDBOX}

$ git clone https://github.com/cloudFPGA/cFSP.git
$ cd cFSP
$ which python3     # (we recommend python 3.6 or higher)
/usr/bin/python3
$ virtualenv -p /usr/bin/python3 cfenv
$ source cfenv/bin/activate
$ pip install -r requirements.txt
Once the cFSP is installed, you must add your cloudFPGA credentials as follows. with the following command:
$ cd ${SANDBOX}/cFSP

$ ./cfsp user load --username=<YOUR_USERNAME> --password=<YOUR_PASSWORD> --project=<YOUR_PROJECTNAME>
The credentials consist of the username, the password and the projectname that were provided
to you when you registered.
The above command creates a file called user.json containing these credentials as depicted by the
output of this command:
0%|                                                                                                                | 0/1 [00:00<?, ?it/s]INFO: Repeat #0
Writing credentials template to ./user.json
['load']
100%|██████████████████████████████████████████████████████████████████████████████████████████████████████| 1/1 [00:00<00:00, 3305.20it/s]
You can watch the content of the credential file with:
$ cd ${SANDBOX}/cFSP

$ ./cfsp user show
0%|                                                                                                                | 0/1 [00:00<?, ?it/s]INFO: Repeat #0
User     : YOUR_USERNAME
Password : YOUR_PASSWORD
Project  : YOUR_PROJECTNAME
['show']
100%|██████████████████████████████████████████████████████████████████████████████████████████████████████| 1/1 [00:00<00:00, 5801.25it/s]
Finally, upload the generated bitstream located in the dcps folder of the ${SANDBOX}/cFp_HelloKale project.
$ cd ${SANDBOX}/cFSP

$ ./cfsp image post --image_file=${SANDBOX}/cFp_HelloKale/dcps/4_topFMKU60_impl_default_monolithic.bit
Similarly to the GUI-API procedure, do not forget to write down the image id returned by the server
(e.g. ‘842d2c6b-33d4-454c-8255-f4b127bd9cf3’).
 0%|                                                                                                                | 0/1 [00:00<?, ?it/s]INFO: Repeat #0
{'breed': None,
 'comment': None,
 'fpga_board': None,
 'id': '842d2c6b-33d4-454c-8255-f4b127bd9cf3',
 'shell_type': None}
100%|████████████████████████████████████████████████████████████████████████████████████████████████████████| 1/1 [00:02<00:00,  2.91s/it]
5.5.1.4.2. Step-5: Request a cloudFPGA instance and deploy it
Now that your FPGA image has been uploaded to the cFRM, you can request a cloudFPGA instance to be programmed and deployed with it. The below step-5a and step-5b will cover both possible options to create a new cF instance.
5.5.1.4.2.1. Step-5a: Create an instance with the GUI-API
To create an instance via the GUI-API, point your web browser at
http://10.12.0.132:8080/ui/#/
Expand the Swagger menu Instances and the operation
[POST] /instances - Create an instance. Then, fill in the requested fields as exemplified below.

Next, scroll down to the server’s response and write down the “role_ip” for later accessing your instance.

5.5.1.4.2.2. Step-5b: Create an instance with the cFSP-API
To create a similar instance via the cFSP-API, enter the following command:
$ cd ${SANDBOX}/cFSP

$ ./cfsp instance post --image_id=31a0d56e-6037-415f-9b13-6b4e625e9a29
Next, and similarly to the GUI-API procedure, do not forget to write down the role_ip (e.g. ‘10.12.200.15’)
and the instance_id (e.g. ‘76’) returned by the server.
 0%|                                                                                                                | 0/1 [00:00<?, ?it/s]INFO: Repeat #0
{'fpga_board': 'FMKU60',
 'image_id': '842d2c6b-33d4-454c-8255-f4b127bd9cf3',
 'instance_id': 76,
 'project_name': 'cf_ALL',
 'role_ip': '10.12.200.15',
 'shell_type': 'NO_SRA',
 'slot_num': 15,
 'status': 'USED',
 'user_id': 'cfdummy'}
100%|████████████████████████████████████████████████████████████████████████████████████████████████████████| 1/1 [01:20<00:00, 80.94s/it]
5.5.1.5. How to access your cloudFPGA instance
5.5.1.5.1. Step-6: Ping the deployed FPGA
Now that you retrieved the IP address of your FPGA instance in step-5, it is good practise to ping your deployed FPGA and assess its availability.
Use the following command to ping the FPGA with its IP address (retrieved in Step-5).
$ ping <role_ip>        (e.g. ping 10.12.200.247)

PING 10.12.200.247 (10.12.200.247) 56(84) bytes of data.
64 bytes from 10.12.200.247: icmp_seq=1 ttl=62 time=1.26 ms
64 bytes from 10.12.200.247: icmp_seq=2 ttl=62 time=0.900 ms
64 bytes from 10.12.200.247: icmp_seq=3 ttl=62 time=0.837 ms
64 bytes from 10.12.200.247: icmp_seq=4 ttl=62 time=0.780 ms
5.5.1.5.2. Step-7: Network tools and Socket communication
As mentioned above, the role of the project cFp_HelloKale implements a set of TCP-, UDP- and DDR4-oriented tests and functions. These features can be called or exercised from a remote host via network tools and network communication sockets as explained in the following two links:
5.5.1.6. How to cleanup (optional)
5.5.1.6.1. Step-8: How to remove a bitstream from the image database (optional)
To remove a bitfile from the cFRM database, use either of the following two procedures.
5.5.1.6.1.1. Step-8a: Delete an image with the GUI-API
Expand the operation [DELETE] /images/{image_id} - Delete an image of the Swagger menu Images, and
fill in the requested fields as exemplified below.

- bulb
You can retrieve a list of all your images by expanding the
[GET] /images - Get all images of a user
of the Swagger menu Images and providing your credentials.
5.5.1.6.2. Step-8b: Delete the image with the cFSP-API
The second option offered to you is use the command-line interface to the cFRM API.
$ cd ${SANDBOX}/cFSP

$ ./cfsp image delete <id>  # E.g. "31a0d56e-6037-415f-9b13-6b4e625e9a29"
5.5.1.6.3. Step-9: How to delete an instance (optional)
To end an instance and return it to cFRM’s pool of resources, use either of the following two procedures.
5.5.1.6.3.1. Step-9a: Delete an instance with the GUI-API
Expand the operation [DELETE] /instances/{instance_id} - Remove an instance of the Swagger menu Instances,
and fill in the requested fields as exemplified below.

- bulb
You can retrieve a list of all your instances by expanding the
[GET] /instances - Get all instances of a user
of the Swagger menu Instances and providing your credentials.
5.5.1.6.4. Step-9b: Delete the instance with the cFSP-API
The second option offered to you is use the command-line interface to the cFRM API.
$ cd ${SANDBOX}/cFSP

$ ./cfsp instance delete <instance_id>  # E.g. "17"